Connecting to EarPurifier
6. Connecting Your Credentials to EarPurifier
With your Kaggle username and API key ready, you can now link them in EarPurifier:
Step 6.1: Open the Settings Dialog
In EarPurifier's navigation rail, click the Settings button (gear icon ⚙️).
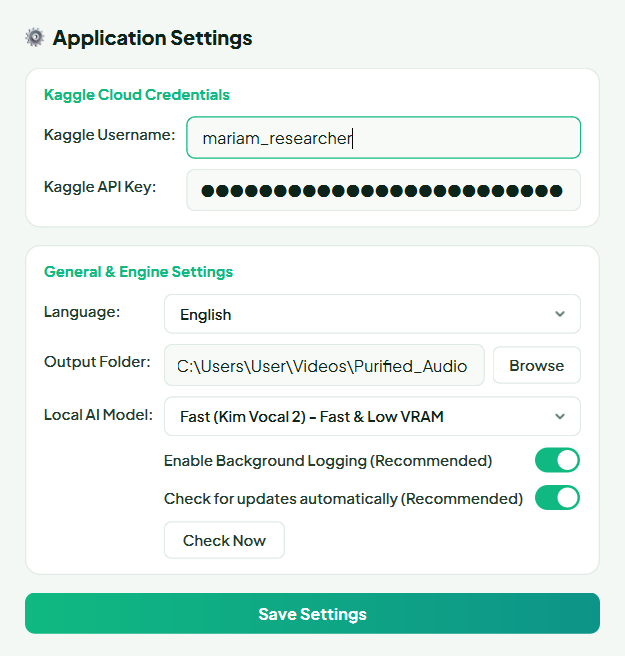
Step 6.2: Enter Your Kaggle Credentials
Under the Kaggle Cloud Credentials card:
- Kaggle Username: Type your exact Kaggle username handle noted earlier.
- Kaggle API Key: Paste the private key copied from Kaggle. The input is masked for screen privacy.
Zero-Trust Credential Security
EarPurifier encrypts your API key at rest using native Windows system encryption. Plaintext tokens never hit the disk unencrypted, are never shared with third parties, and communicate exclusively with official Kaggle servers via secure connections.
Step 6.3: Select Default Output Folder (Optional)
Under the General & Engine Settings card:
- Click Browse... to designate the folder where EarPurifier saves all purified media files.
Step 6.4: Update & Language Preferences
- Language: Switch default application language between English and Arabic.
- Check for Updates Automatically: EarPurifier automatically checks for new releases on app startup and alerts you when an update is available.
- Diagnostics Logging: Records session events to help diagnose issues if needed (on by default).
Step 6.5: Save Preferences
Click Save Settings at the bottom of the dialog.
You are now ready to purify your first file!